
 20
20
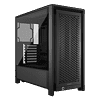
Corsair Frame 4000D Review
Thermal Stress Test »Assembly


As the motherboard tray may be removed, we took the opportunity to install our BTF motherboard outside the confines of the chassis. The shape of the tray allows for this without the rear facing headers touching your work surface, which is a small but very nice detail.


Once the tray is in place, you can see that all the connectors are easily accessible, which is something that wasn't perfect in the original 4000D we had reviewed. In the front facing picture you can also see that we have applied the magnetic black cover strip to the right edge of the tray to hide the openings of the tray, which would otherwise be visible here.


To install the fans in the front, you first have to clip the plastic bits unto the rails. They can be moved vertically freely, so you can adjust the height of the cooling units as well. With three 120 mm fans, there may not be a lot of wiggle room but if you do opt for two 140 mm, you will have plenty of freedom to adjust the height of the fan placement.

Installing the GPU, there is also tons of room for the longest units, meaning that you may pair one of these with a thick liquid cooling setup in the front without issue. The GPU support beam is not visible, but does an excellent job in keeping the unit from sagging.


The storage mounting plates use a captive screw to hold in place on the floor or backside of the motherboard. Adding a 2.5" drive means that you can have two of them or leave space for the Corsair iCUE Link hub alongside. Putting the tray back into place is easily done, as you can remove the metal portion of the side to gain access.


Similarly, adding a 3.5" drive is done the same way, using the provided screws. As this unit is rotated 90°, its connectors will face towards the front of the chassis when the tray is placed on the backside of the motherboard, or towards you in a classic sense when it is placed on the floor of the chassis.

Installing the PSU is straightforward and doesn't really need any tools either if you are content with the two captive thumb screws. This setup does hold any unit in place perfectly and the only reason you need to add two more traditional screws would be if you were to ship or transport the system somewhere. Corsair could have included two additional, separate thumb screws to make this part of the assembly completely tool-free.


To install the 360 mm AIO in the ceiling, we moved the Infinirail to the 120 mm position and then secured the unit with plenty of clearance to the motherboard and the fan area in the rear, as well as just enough in the front.


With everything installed, we also replaced the white, semi-translucent backing on the bottom portion of the main side panel with the black one. We managed to route the wiring for the three front fans out of sight behind the solid cover as well. While this doesn't look super clean, all that mess is hidden from view. The Velcro strips down the center of the case are sufficient to hold essentially all wiring nicely. We did end up using a few of our signature red zip ties, just for good measure.
Finished Looks


With the system turned on, the white LED around the round power button lights up gently as well and the fans can clearly be seen.


Thanks to the unique shape of the front panel paired with the unobstructive dust filter, you can see the fans in all their glory. This setup is very nice to see and the three-dimensional surface of the front panel manages to pop even more with a bit of illumination. In the rear, everything is where you would expect to see it. Corsair includes three Velcro strips and a hook for external cable management as well, so that you may keep all your wiring attached to the motherboard backplate as clean as possible. In our setup, we don't have any additional wires attached, so we did not end up using any of these anyway.


Thanks to the clear glass panel, you can easily see all your components within the chassis. The small Corsair logo at the top is a nice touch as well as the glass only sporting black strips on the back and front. Turning the system around, the mesh will certainly emit the glow of any ARGB cooling you may end up installing here as well. But, as we retained the solid cable cover, you aren't seeing anything here with our build scenario.
May 1st, 2025 21:29 EEST
change timezone
Latest GPU Drivers

New Forum Posts
- Free Games Thread ( 4653 )
- The Official Magic the Gathering card game Rules, Questions, and General Discussion Thread ( 250 )
- RX 9070 availability ( 271 )
- Help in overclocking the AMD Ryzen 7 7700 in ASUS TUF B650-PLUS WiFi Mobo ( 9 )
- Are the 8 GB cards worth it? ( 592 )
- any bios scientists in my absence? ( 1 )
- Subsystem Id of my Asus Strix RTX 4090 OC / Random GPU detection problem ( 20 )
- Idle issue since 5060 ti installed ( 12 )
- DTS DCH Driver for Realtek HDA [DTS:X APO4 + DTS Interactive] ( 2157 )
- CPU Database ( 218 )

Popular Reviews
- Clair Obscur: Expedition 33 Performance Benchmark Review - 33 GPUs Tested
- ASUS GeForce RTX 5090 Astral Liquid OC Review - The Most Expensive GPU I've Ever Tested
- Seasonic Vertex GX 850 W Review
- Oblivion Remastered Handheld Performance Review
- NVIDIA GeForce RTX 5060 Ti 8 GB Review - So Many Compromises
- Upcoming Hardware Launches 2025 (Updated Apr 2025)
- Montech HS02 PRO Review
- Sapphire Radeon RX 9070 XT Pulse Review
- Sapphire Radeon RX 9070 XT Nitro+ Review - Beating NVIDIA
- AMD Ryzen 7 9800X3D Review - The Best Gaming Processor
Controversial News Posts
- NVIDIA GeForce RTX 5060 Ti 16 GB SKU Likely Launching at $499, According to Supply Chain Leak ( 182 )
- NVIDIA Sends MSRP Numbers to Partners: GeForce RTX 5060 Ti 8 GB at $379, RTX 5060 Ti 16 GB at $429 ( 128 )
- NVIDIA Launches GeForce RTX 5060 Series, Beginning with RTX 5060 Ti This Week ( 115 )
- Nintendo Confirms That Switch 2 Joy-Cons Will Not Utilize Hall Effect Stick Technology ( 105 )
- Nintendo Switch 2 Launches June 5 at $449.99 with New Hardware and Games ( 99 )
- NVIDIA PhysX and Flow Made Fully Open-Source ( 88 )
- Sony Increases the PS5 Pricing in EMEA and ANZ by Around 25 Percent ( 84 )
- Parts of NVIDIA GeForce RTX 50 Series GPU PCB Reach Over 100°C: Report ( 78 )