How to Clear and Wipe a Hard Drive
Summary: Learn how to clean (erase data or wipe data) and reset your hard drive. This guide covers wiping, cleaning up your hard drives (HDD), and securely removing all data to prepare your drive for reuse or sale. ...
This article applies to
This article does not apply to
This article is not tied to any specific product.
Not all product versions are identified in this article.
Instructions
Deleting files from a hard drive does not remove them, the operating system reassigns that space to allow new files to be added later. Properly wiping a drive ensures that the files are erased and prevents anyone from recovering the deleted data.
If your computer is running out of free space, learn How to Free up Disk Space in Microsoft Windows .
There are several good reasons why you may want to wipe your hard drive.
- You want to protect your privacy before selling or giving away your device. Always wipe the hard drive (or USB drive) when you are selling, giving away, or trading in your computer. This ensures personal data on the drive is not recoverable. For specifics if you are trading in or recycling your computer through Dell, see Dell KB article Securely Erasing Data on Your Device Before Trade In or Recycle
- You suspect the device has malware. If anti-malware or anti-virus applications cannot remove the malware, wiping the hard drive might help.
- You want to erase data on the hard drive before replacing the drive.
- You want to erase data on a secondary hard drive or an external drive.
If you are trying to sanitize a solid state drive (SSD), see Dell KB article Data Removal Processes for a Solid-State Hard Drive
For instructions on using Dell Data Wipe on commercial devices, see Dell KB article Dell Data Wipe .
Wiping your hard drive
Deleting files using the Shift + Delete key combination or emptying the recycle bin does not permanently delete the files. If you are using Windows 11, Windows 10, or Windows 8.1, wiping your hard drive is straightforward.
WARNING:
Wiping the data on the hard drive results in the permanent loss of all data. Dell Technologies recommends that you back up all personal data, including but not limited to images, documents, email messages, contacts, browser bookmarks (favorites), music, videos, and so on. Back up your data to an external hard drive, or a cloud backup service such as OneDrive.
- Go to Start > Settings > Update & Security > Recovery > Reset PC .
-
Select
Remove everything
, and then
Remove files and clean the drive
.
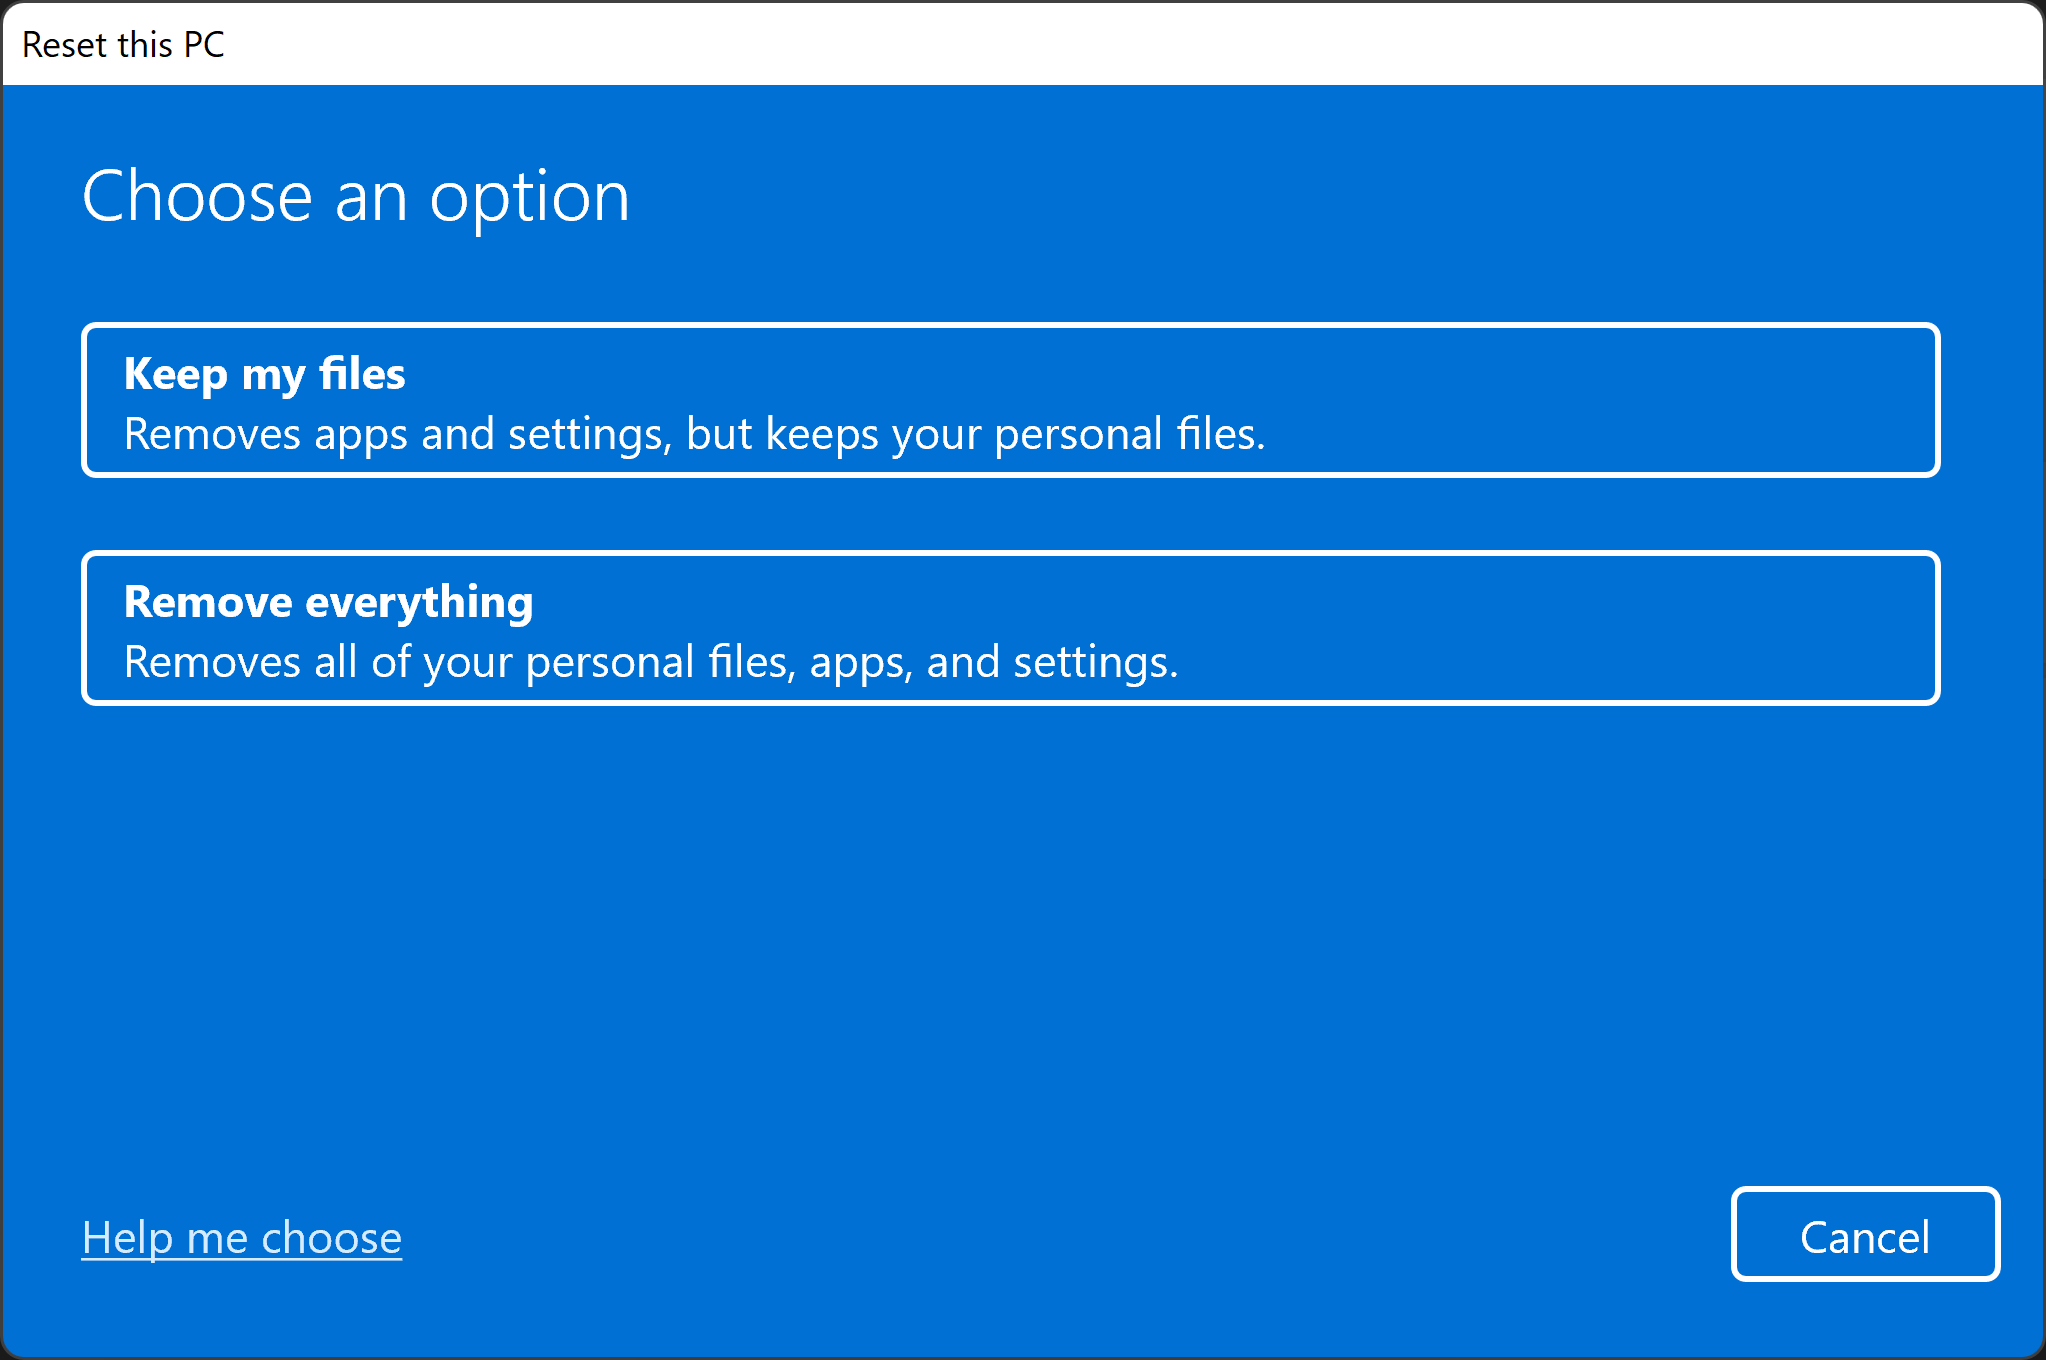
- Click Next , Reset , and then Continue .
If you are using Windows 8 or earlier versions of Windows, there are several third-party software available to wipe your hard drive (disk wipe tool). Such software is available as freeware, shareware, or commercially available for download. Some users may be required to use software that meets the US DoD 5220.22-M requirements for sanitizing a drive. For help with third-party software, go to the software manufacturers website.
WARNING:
Dell Technologies does not endorse any specific software for erasing or wiping the hard drive. Dell Technologies has not independently qualified or tested such software, nor assumes any responsibility with the use of such software.
How to format an external drive or USB drive
Deleting files using Shift + Delete key combination or emptying the recycle bin does not permanently delete the files.
There are two types of formatting on a USB drive.
- Quick format - Deletes the file system table and the root folder. This option is frequently used for USB flash drives to efficiently free up the available space to transfer or store other files. It is not the most secure way to delete your files because the data may still be recoverable with data recovery tools.
- Full format - Scans the drive for bad sectors and write zeros in all sectors, which delete all data permanently. This action can take a long time, depending on the capacity of the drive.
How to format an external drive using the Windows Format tool.
Formatting an external drive (USB hard drive or flash drive) wipes any data on it and prepares it for use with your device. Follow these steps to reformat an external drive using the Format tool in Windows 11 or Windows 10.
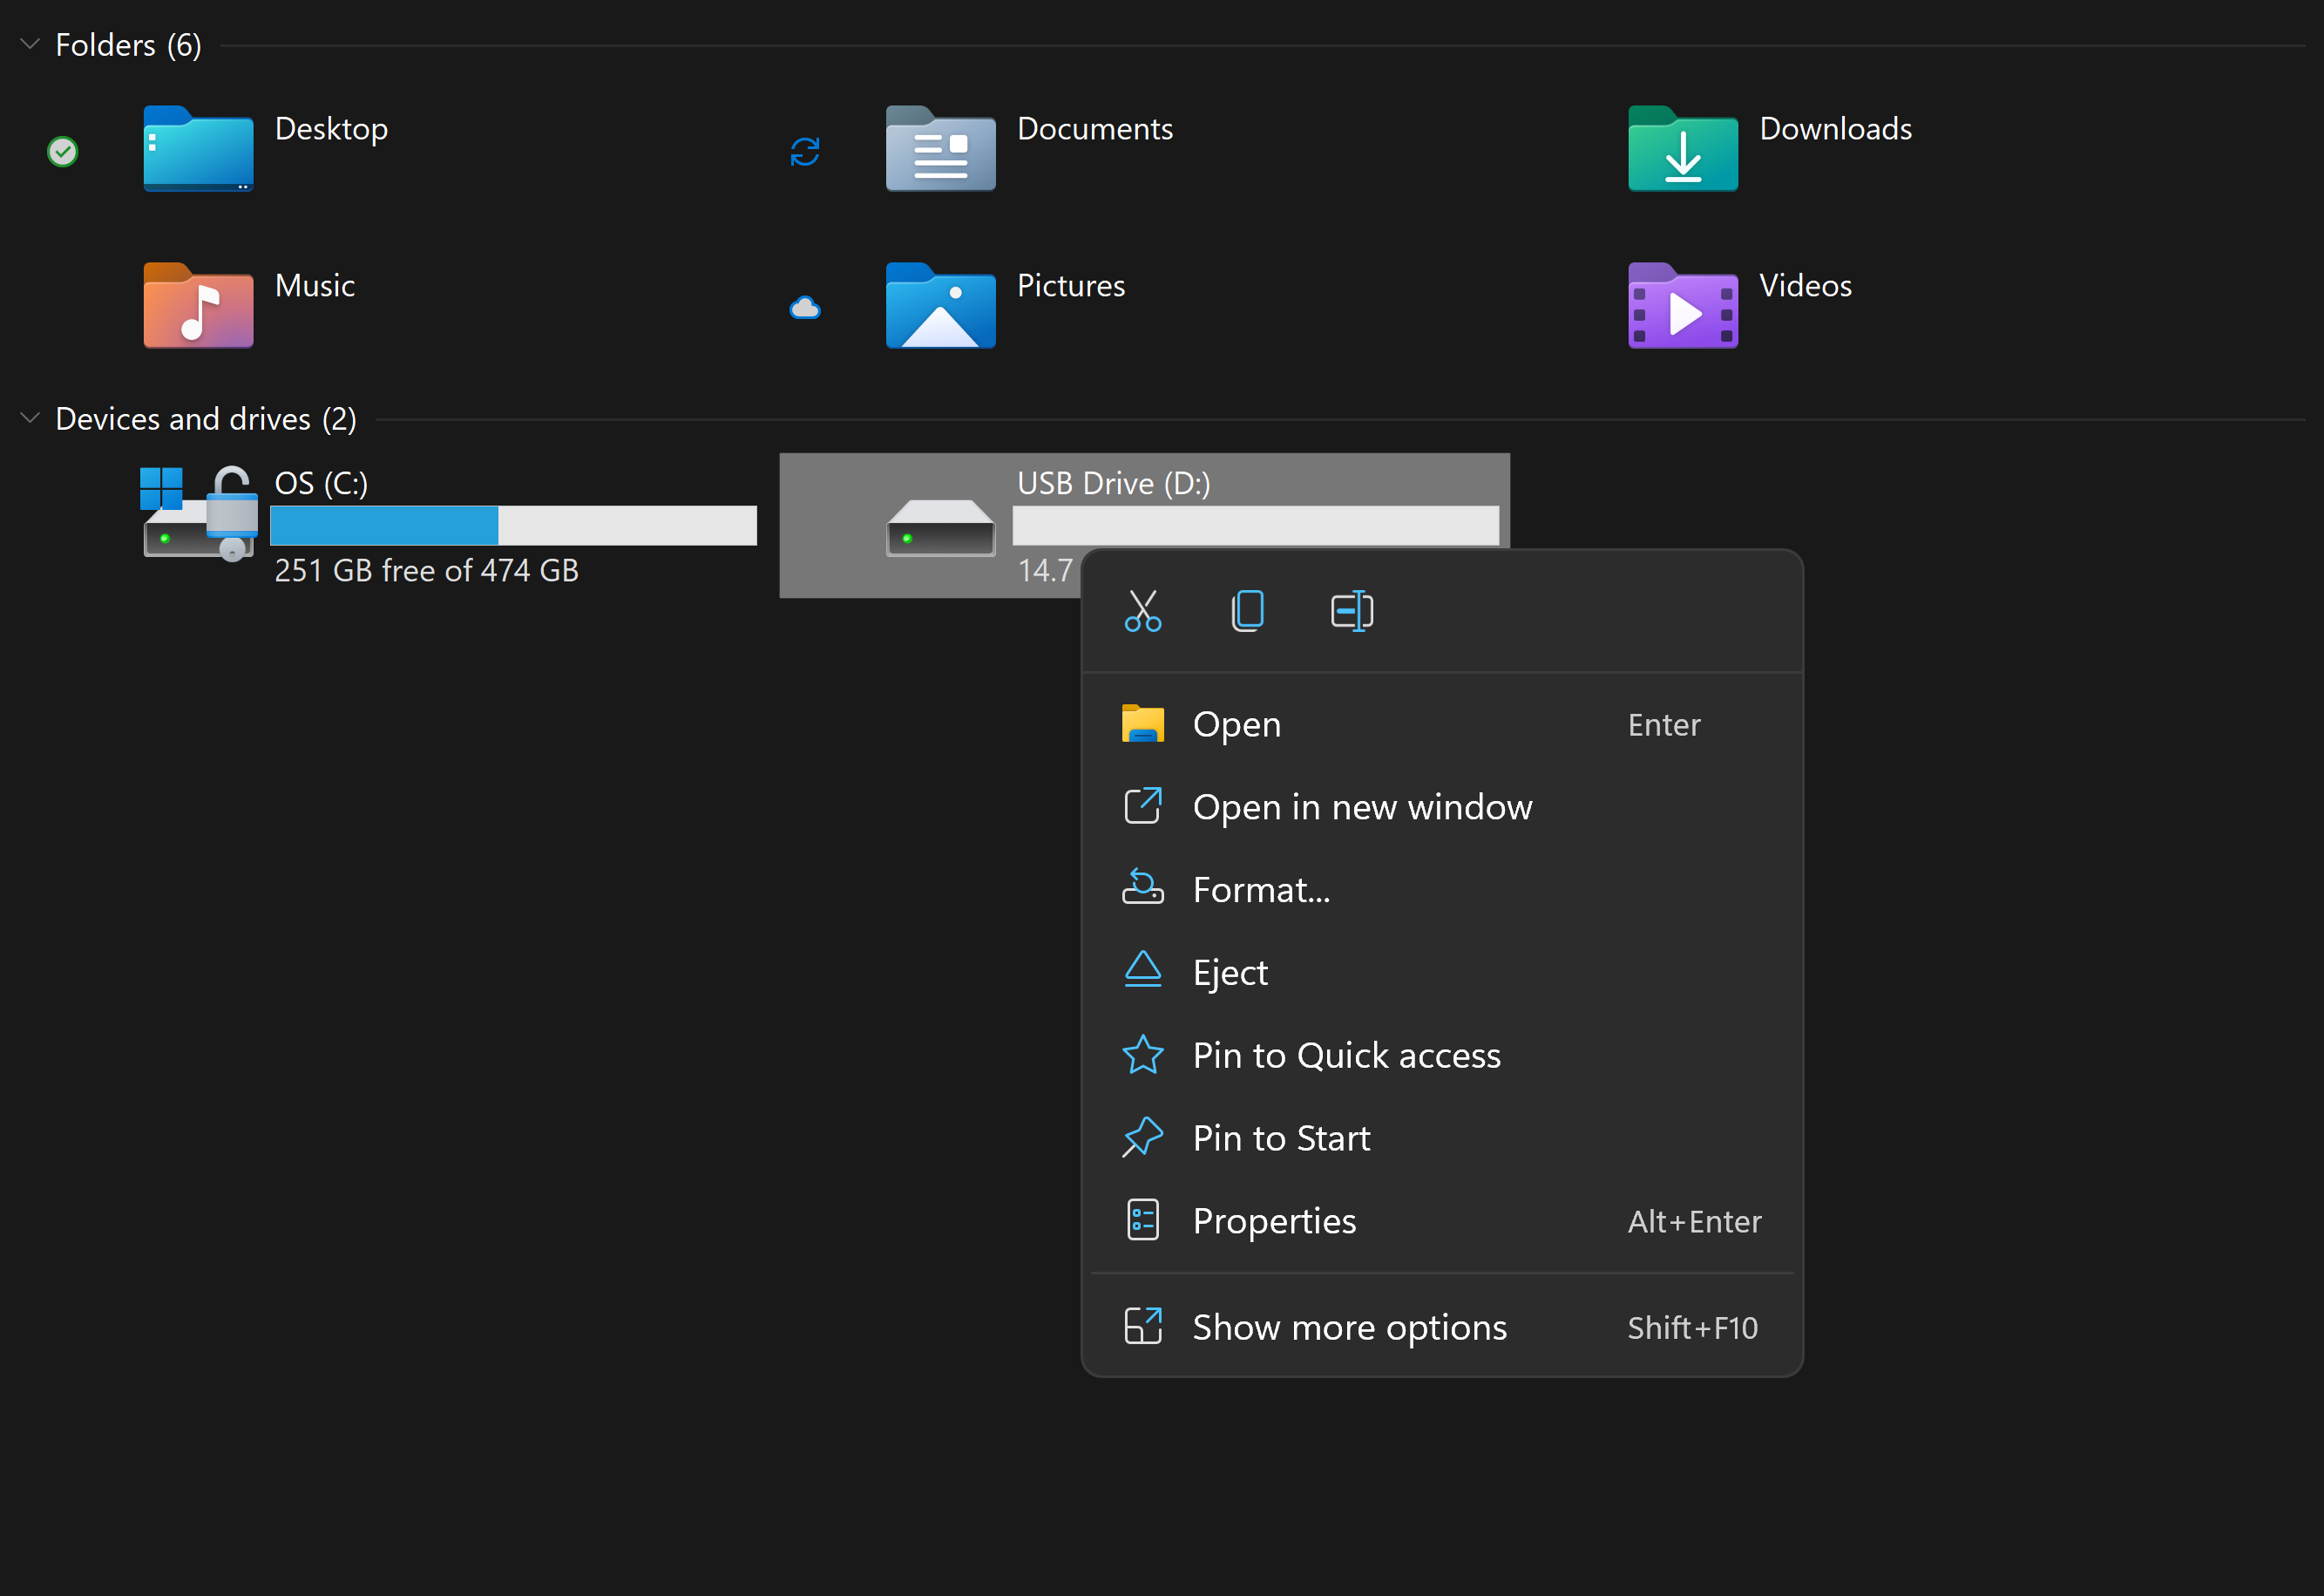
- Connect the external drive to the computer.
- Click Start , search for and open the File Explorer app.
-
Right-click the external drive and select
Format
.
-
Select the formatting options and click
Start
.
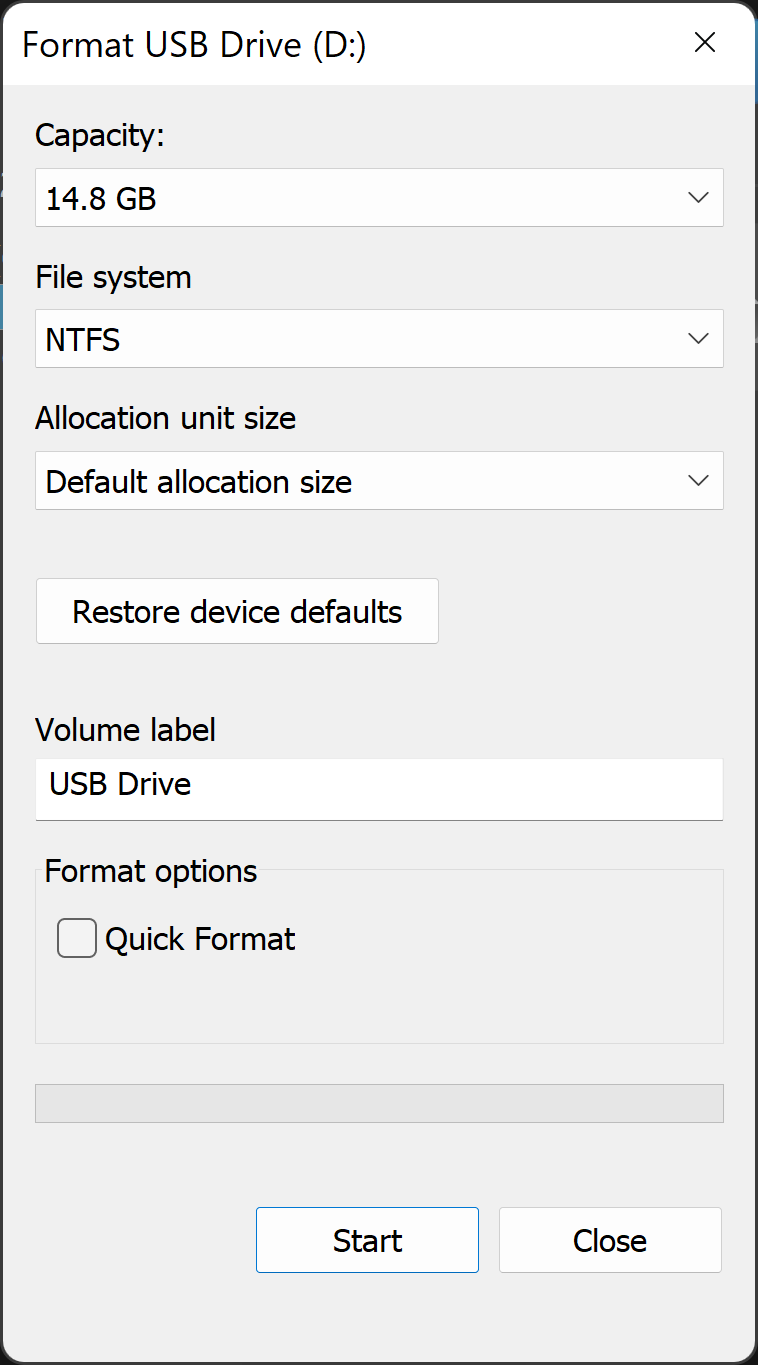
- In the File system textbox, choose NTFS .
- In the Allocation unit size textbox, choose Default allocation size . The best allocation size based on the size of the hard drive is chosen.
- In the Volume label textbox, type the name of the drive that appears in File Explorer. For example, a USB drive.
- Clear the Quick format checkbox. Windows checks this box by default. Using the standard format ensures that each sector of the hard drive is checked for errors and overwritten with a zero.
- Clear the Enable file and folder compression checkbox.
NOTE:
If the external drive does not appear in
File Explorer
, the current format may not be compatible with Windows. Use the Disk Management tool in Windows to format the external drive.
How to format an external drive using Windows Disk Management tool
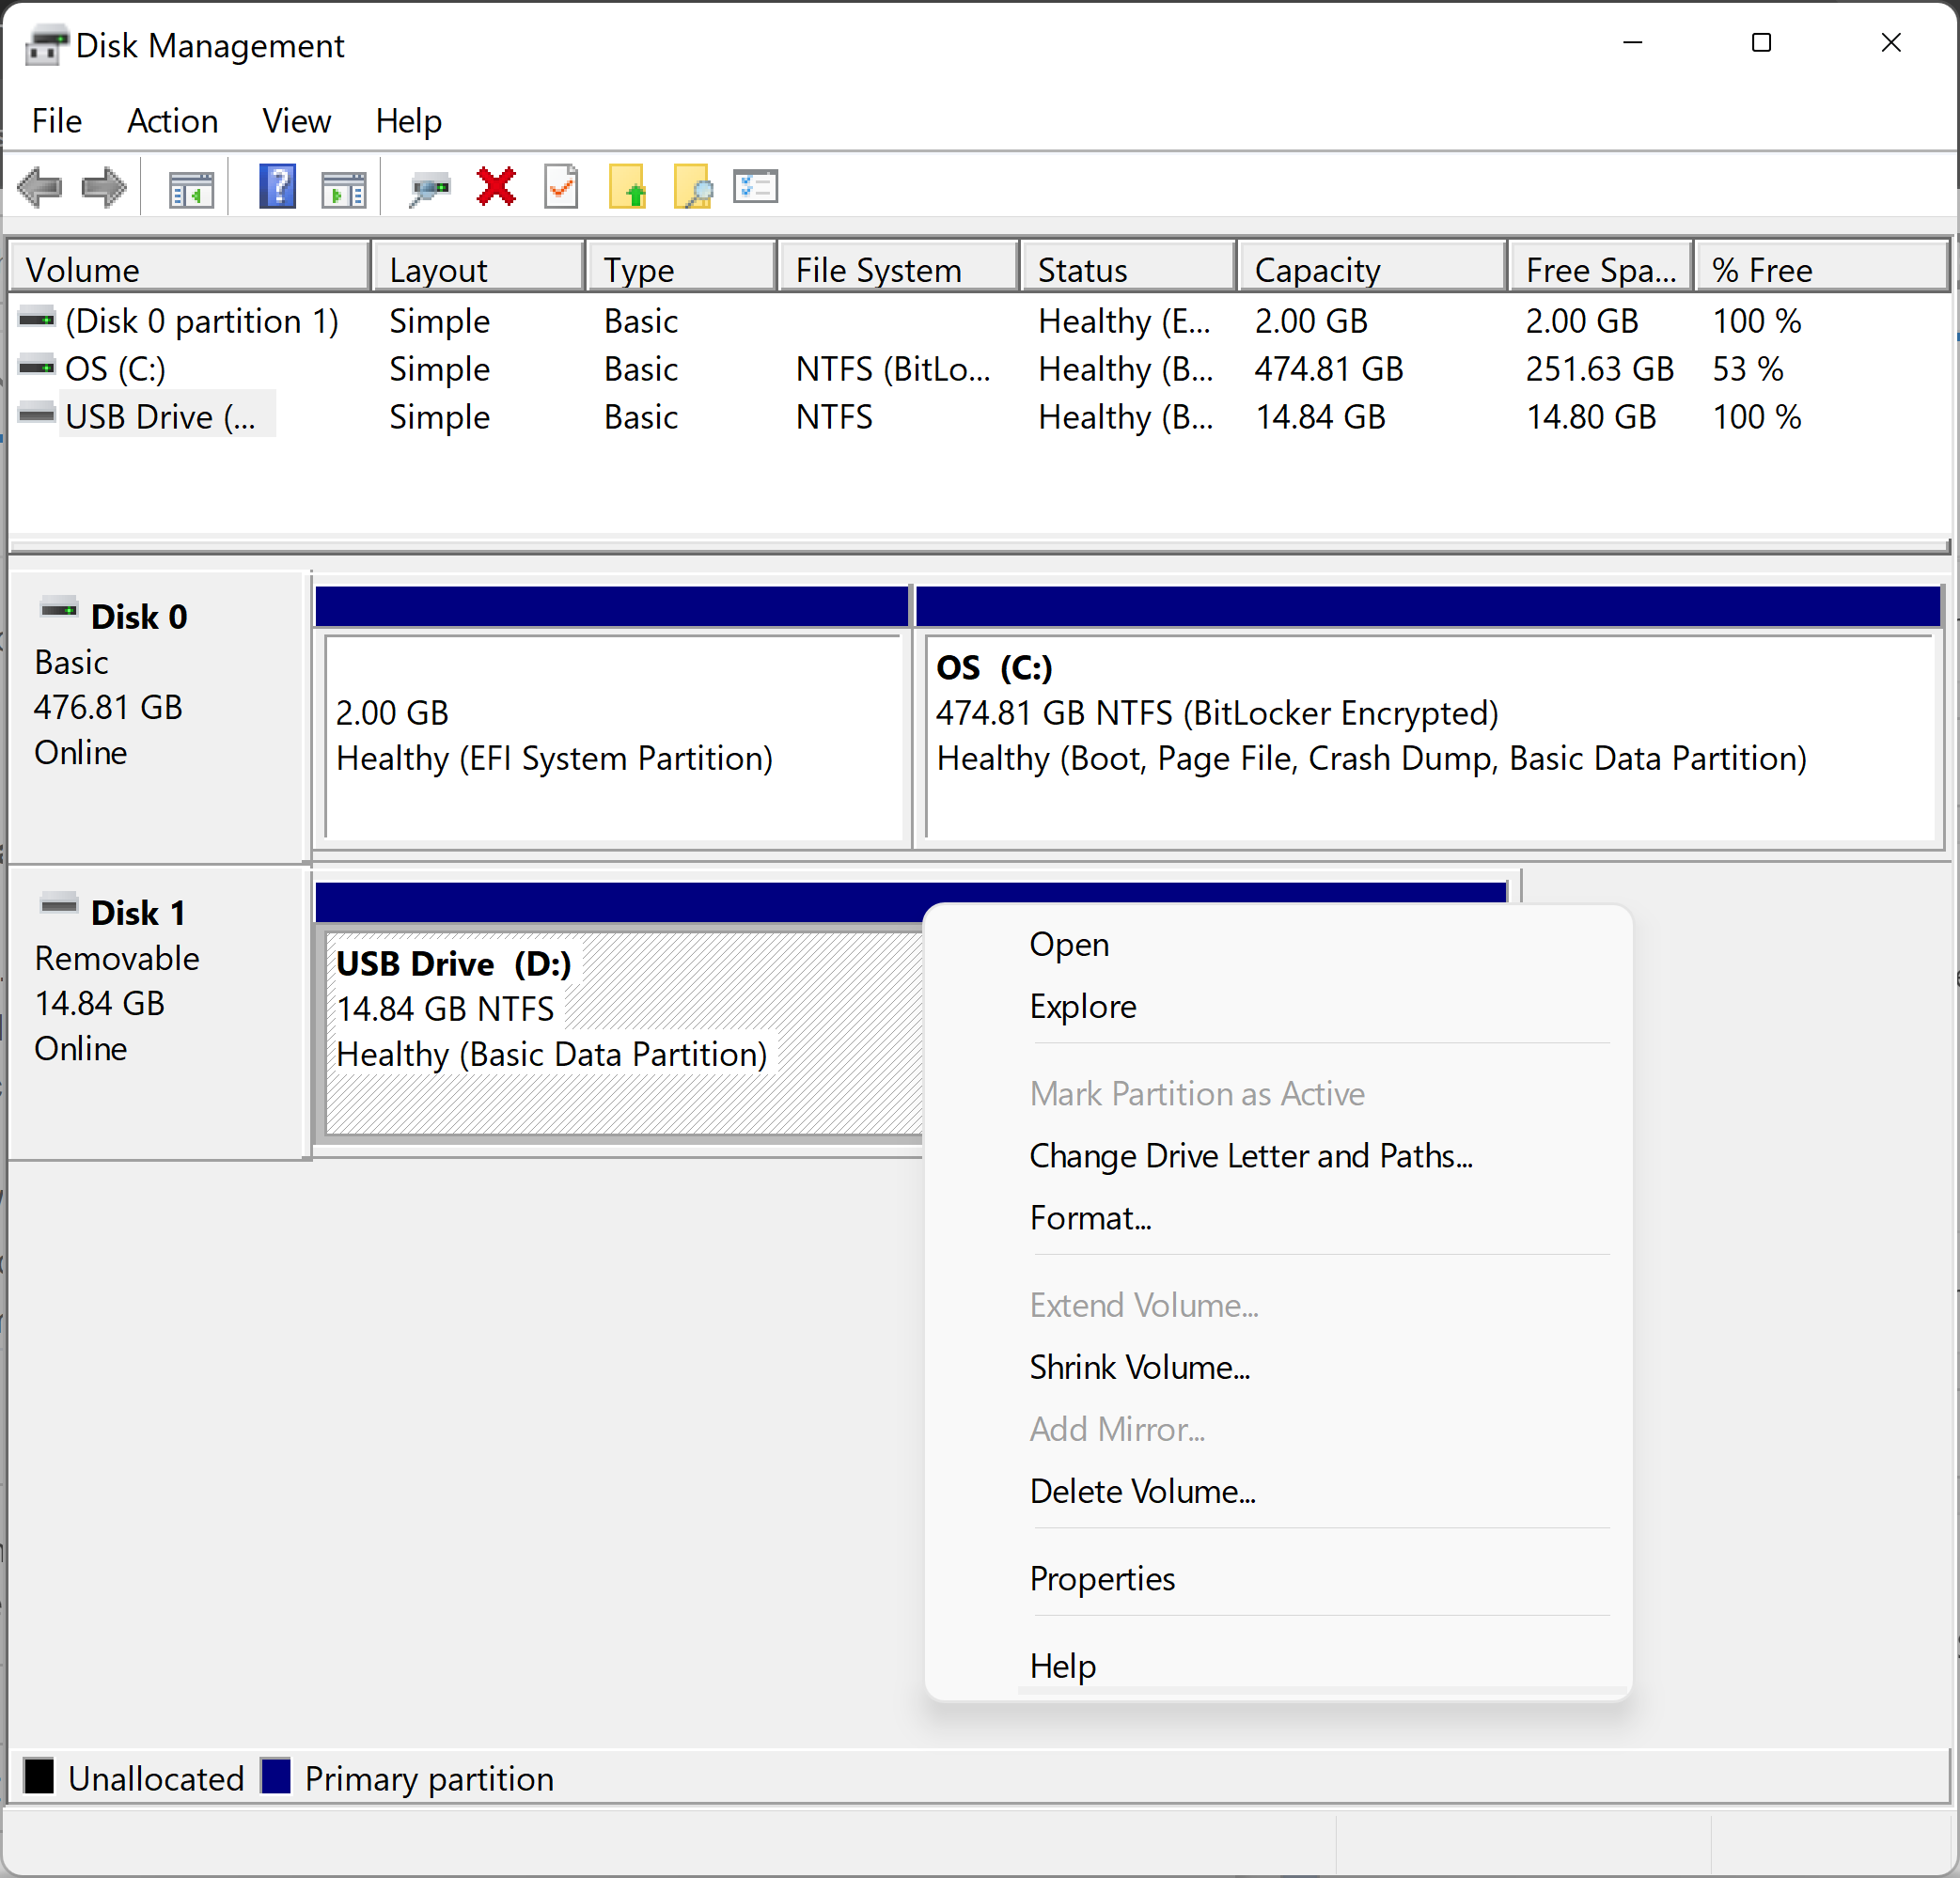
The Disk Management tool in Windows can divide disks into partitions, or volumes. You can use Disk Management to wipe a disk that is not formatted for Windows.
- Connect the drive to the computer.
- Click Start , search for and open the Disk Management app.
-
Right-click the drive and select
Format
.
-
Select the formatting options and click
Start
.
- In the File system textbox, choose NTFS .
- In the Allocation unit size textbox, choose Default allocation size . The best allocation size based on the size of the hard drive is chosen.
- In the Volume label textbox, type the name of the drive that appears in File Explorer. For example, a USB drive.
- Clear the Quick format checkbox. Windows checks this box by default. Using the standard format ensures that each sector of the hard drive is checked for errors and overwritten with a zero.
- Clear the Enable file and folder compression checkbox.
Initializing a disk in Disk Management
If the drive you are trying to wipe cannot be formatted, you may be required to initialize the drive. Initializing a drive wipes the drive and reformat it for Windows.
- Right-click the drive and select Initialize . Select GPT and click OK .
- Change the Volume label , select a File system (choose NTFS format to use the disk with Windows devices), leave the Allocation unit size as Default allocation size , and click OK .
Affected Products
Alienware, Inspiron, Legacy Desktop Models, Vostro, XPS, G Series, G Series, Alienware, Inspiron, Latitude, Vostro, XPS, Legacy Laptop Models, Fixed Workstations, Mobile WorkstationsArticle Properties
Article Number:
000134730
Article Type:
How To
Last Modified:
05 Dec 2024
Version:
10
Find answers to your questions from other Dell users
Support Services
Check if your device is covered by Support Services.